Understanding DIY Concrete Slab
When working with DIY concrete, it’s crucial to understand the process thoroughly. Ensuring sufficient subgrade preparation and using the correct tools are vital for a successful project. Additionally, paying attention to weather conditions and reinforcing the concrete adequately can prevent mishaps. Understanding the nuances of the process is essential for a smooth diy concrete floor installation. Utilizing resources such as YouTube tutorials for masonry techniques can be immensely helpful. It’s also important to note that concrete work requires careful handling to avoid chemical burns, making safety precautions a top priority.
What is a DIY Concrete Slab?
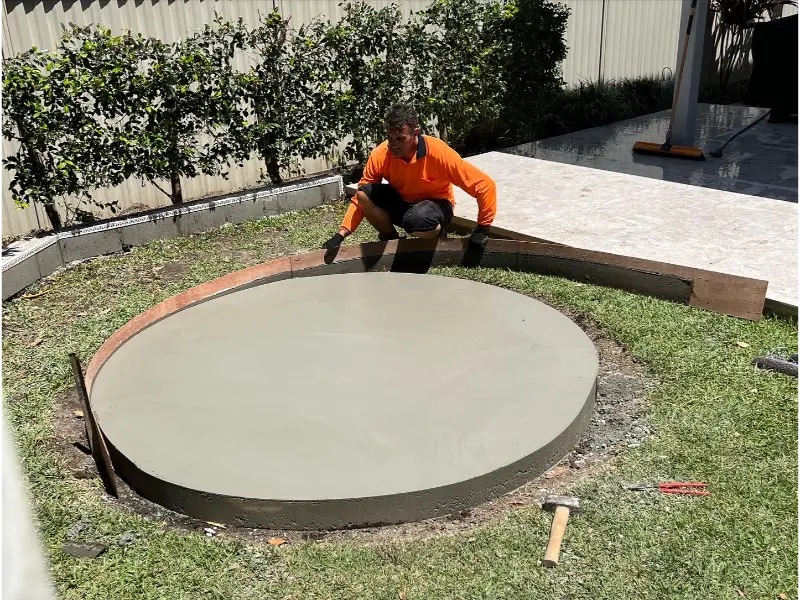
A DIY concrete slab is a rectangular surface made by pouring wet concrete into formwork. It provides a strong base for outdoor applications. The slab’s thickness depends on its intended use and can be reinforced for added strength.
When creating a DIY concrete slab, it’s essential to recognize the advantages it offers. These slabs provide a durable and long-lasting solution that can withstand heavy loads and foot traffic. By minimizing the risk of tripping or sinking, they ensure a stable surface for outdoor furniture and pavers. Additionally, DIY concrete slabs enhance the aesthetic appeal of your outdoor space, making them a valuable addition to any property.

Essential Tools and Materials for DIY Concrete Slab
When working on a DIY concrete slab, it is crucial to have the essential tools and materials ready. The necessary tools include a shovel, level, trowel, and wheelbarrow. Additionally, materials such as concrete mix, reinforcement mesh, and plastic sheeting are required. Ensuring you have all these items on hand will streamline the process and prevent delays. It’s also important to have helpers available to assist with tasks that require additional manpower.
For a successful DIY slab project, obtaining the necessary tools is crucial. You’ll need a tamper to compact the soil and a mixer, wheelbarrow, and cutter for the concrete mix. Safety is paramount, so don’t forget goggles, long pants, and proper footwear. Additionally, formwork requires pegs, trench mesh, and a carpenters’ center. Finally, finishing tools include a steel trowel, concrete contractor, and a bull float to ensure a smooth and level concrete floor.
Step-By-Step Guide to Forming and Pouring a DIY Concrete Slab
Preparing the site involves clearing the area of any debris and vegetation to ensure a firm foundation. Setting and leveling one side is crucial for determining the slab’s final height and slope. Staking and bracing the side form provides support to prevent the concrete from leaking out. Squaring, leveling, and staking the other sides ensure that the slab has straight and even edges. Filling and leveling the area with the right amount of concrete ensures uniformity in the slab’s thickness. Packing the fill firmly will prevent the formation of air pockets. Tying in the rebar for slab strength is essential for reinforcing the concrete floor.
Before starting the concrete pouring process, it’s crucial to ensure that the ground is properly compacted to avoid any future issues with the concrete floor. Additionally, removing any debris, rocks, or roots from the designated area is essential to achieve a smooth surface for the slab. Using a plate compactor can help in achieving a solid and even surface, reducing the risk of chemical burns and other safety hazards during and after the concrete pouring. Considering the moisture levels and forecasted weather when preparing the site is imperative for the stability and integrity of the concrete slab. Finally, digging the area to the correct depth is vital for ensuring the width and strength of the slab, preventing any potential issues or the need for extensive repairs in the future.
Staking and Bracing the Side Form
To secure the formwork from movement, stakes should be placed at regular intervals, and the formwork should be braced to prevent any bowing, bulging, or shifting. Using a rubber mallet for driving the stakes into the ground adds stability. It’s crucial to verify the alignment of the formwork to ensure it matches the intended slab dimensions. Carefully placing and bracing the side form is essential for a well-formed concrete slab.
Ensuring accuracy in your concrete slab project involves precisely squaring, leveling, and staking the formwork. These foundational steps are crucial for the durability and longevity of the concrete floor. Taking time to achieve precision during this stage is essential for a successful project outcome. Accurate squaring, leveling, and staking directly impact the quality of the concrete slab and reduce the risk of potential issues such as chemical burns. To achieve professional results, it’s important to dedicate efforts to these tasks.
Filling and Leveling
Achieving a uniform surface for the concrete slab begins with evenly filling and leveling the formwork. This foundational step sets the stage for a smooth and professional-looking concrete floor. Consistency in this process is crucial as it directly impacts the strength of the concrete slab. Precision is key to ensuring that potential issues are prevented in your concrete slab project. Each inch matters, and proper filling and leveling will help prevent future problems, making the project much more manageable.
Properly compacting the fill material is essential for creating a sturdy base for your slab project. Well-packed fill material establishes a robust foundation for the concrete slab, preventing settling and unevenness. This meticulous compaction minimizes the risk of future settlement, influencing the stability of the concrete slab. By ensuring the density of the fill material, you contribute to the overall strength and durability of your floor.
Tying in the Rebar for Slab Strength
Tying in the rebar fortifies the concrete slab, enhancing its strength and durability. Properly executed rebar tying provides essential structural support for your project, boosting the load-bearing capacity and resistance to potential cracking. Implementing a comprehensive rebar tying strategy is crucial to strengthen your slab, ensuring its longevity and reliability.
Preparing for the Concrete Truck
Proper planning for the arrival of the concrete truck is crucial for an efficient and safe pouring process. Adequate preparation streamlines the pouring phase, minimizing potential disruptions and delays in your concrete slab project. Careful planning sets the stage for a successful pour, ensuring that everything is ready to avoid any last-minute hiccups. Thorough preparation is essential to avoid inefficiencies and to maintain safety standards during the floor pouring.
Skillful execution of pouring and leveling techniques is crucial in determining the surface quality of your slab. Precision in these methods contributes to a smooth and uniform floor, ensuring a professional finish. The pouring and leveling phase demands meticulous attention to detail for flawless surface formation, minimizing the risk of chemical burns or injury. Careful execution of these steps guarantees an aesthetically pleasing concrete slab finish and minimizes the usage of too much water, preventing unnecessary complications during the curing process.
Finishing Techniques for Concrete Slab
When completing a floor, employing the right finishing techniques is crucial. These techniques not only enhance the aesthetics and durability of the surface but also contribute to its overall quality and longevity. The texture and appearance of the concrete slab are directly impacted by the finishing techniques employed. Therefore, attention to detail in these techniques is essential for elevating the overall look of the floor. Proper finishing techniques can make a significant difference in the outcome, ensuring a visually appealing and durable surface.
Setting the Anchor Bolts
Ensuring secure and stable attachment for structures on the floor, precise setting of anchor bolts is vital. It provides a reliable foundation for subsequent construction, laying the groundwork for a structurally sound slab. Accurate positioning of anchor bolts is essential to prevent potential issues and chemical burns. Setting anchor bolts with precision ensures stability and guards against width problems. It’s crucial in preventing injuries and accidents during the construction process, especially when dealing with chemical substances.
Cutting Control Joints
Strategically positioning and cutting control joints in your floor helps manage cracking and shrinkage, reducing the risk of unsightly surface imperfections. Thoughtful placement of control joints minimizes the potential for random cracking, promoting long-term durability. By executing proper control joint cutting at suitable intervals, you can minimize the impact of concrete shrinkage on your slab. This meticulous approach significantly contributes to the overall strength and quality of the concrete floor, ensuring its longevity.
Smoothing with Trowels
Skillful application of trowels results in a polished and professional finish for the concrete slab. Methodical trowel work contributes to an even and visually appealing surface, enhancing the overall appearance of the floor. The precise techniques of trowel smoothing dictate the final texture and appearance of the slab. Attentive trowel smoothing ensures a refined and polished surface, avoiding any need for rework or refinishing.

Common Mistakes to Avoid when Making a DIY Concrete Slab
When working with concrete, insufficient subgrade preparation is a common mistake that can compromise the quality and durability of the DIY concrete slab. Additionally, using incorrect tools can lead to uneven finishing and imperfections in the floor. It’s important to avoid neglecting the weather conditions during the pouring and curing process to prevent potential issues like cracking. Also, inadequate reinforcement of concrete with rebar can result in a lack of structural strength and potential hazards.
Insufficient Subgrade Preparation
Insufficient subgrade preparation may result in unstable concrete slabs and potential future cracking. A properly prepared subgrade serves as a sturdy foundation, crucial for the integrity of your floor. Thorough compaction of the subgrade is essential to prevent uneven settling of the concrete slab. Neglecting this preparation can lead to structural issues. Consider using a plate compactor to achieve a well-compacted subgrade, ensuring the width and depth meet masonry requirements without compromising stability.
Using Incorrect Tools
When working with wet concrete, safety glasses and rubber boots are essential. Proper tools like a bull float and steel trowels ensure a smooth, finished floor. Using forms helps maintain the desired shape of the slab, while a plate compactor aids in efficiently compacting large slabs. Remember, using incorrect tools can result in chemical burns or an irregular surface, so always prioritize safety and precision. Be sure to watch YouTube tutorials by masonry experts for more insights on tool selection and usage.
Neglecting the Weather
When working with concrete, it’s essential to consider the impact of weather conditions. Extreme heat can accelerate drying time, while rain may compromise the integrity of your floor. Proper moisture control is crucial, especially in humid environments. Similarly, pouring concrete in direct sunlight should be avoided to prevent rapid drying and shrinkage. Additionally, extreme cold can slow down the drying process, affecting the strength and durability of the concrete. Monitoring weather forecasts and taking necessary precautions can help avoid potential issues and ensure a successful outcome.
Inadequate Reinforcement of Concrete
When pouring a concrete slab, it’s crucial to add reinforcing mesh to control cracking and consider using rebar for extra reinforcement, especially for heavy loads. Properly placed control joints manage shrinkage, and ensuring the correct amount of concrete is poured is critical for reinforcement. Consulting a concrete contractor for guidance can enhance slab durability. These measures help prevent issues such as chemical burns, as they improve the strength and stability of the floor, ensuring safety and longevity.
Are DIY Concrete Slabs Worth the Effort?
Understanding the benefits of undertaking a DIY concrete slab project is crucial. Assess the thickness according to its use, seek professional assessment, and calculate the required concrete amount. Evaluate long-term cost savings for an informed decision.
Frequently Asked Questions
Can you do concrete by yourself?
Yes, it is possible to do concrete by yourself as long as you have the right tools and knowledge. Proper preparation, including leveling the ground and setting up forms, is crucial. Use the correct ratios of cement, sand, and water for a strong and durable slab. Safety precautions should always be taken.
What is the cheapest way to make concrete?
The most cost-effective way to make concrete is by combining Portland cement, sand, and gravel. By mixing these ingredients yourself instead of purchasing pre-mixed bags, you can save money. It’s important to use the correct proportions of each component to maintain the quality of the concrete.
How do I lay a concrete slab?
To lay a concrete slab, start by preparing the area by removing grass and debris and creating a level base. Mix the concrete according to instructions and pour it onto the prepared area. Use a screed board to level the concrete, then smooth the surface with a float. Allow the concrete to cure for at least 24 hours before walking on it or adding weight.
Conclusion
In conclusion, creating a DIY concrete slab can be a rewarding and cost-effective project if done correctly. However, it’s important to avoid common mistakes that can compromise the quality and durability of the slab. These include insufficient subgrade preparation, using incorrect tools, neglecting the weather conditions, and not adequately reinforcing the concrete. By following the step-by-step guide provided and being mindful of the potential pitfalls, you can ensure a successful outcome for your DIY concrete slab project. Remember, if you have any doubts or questions, it’s always best to consult with professionals or seek expert advice. Happy building!
